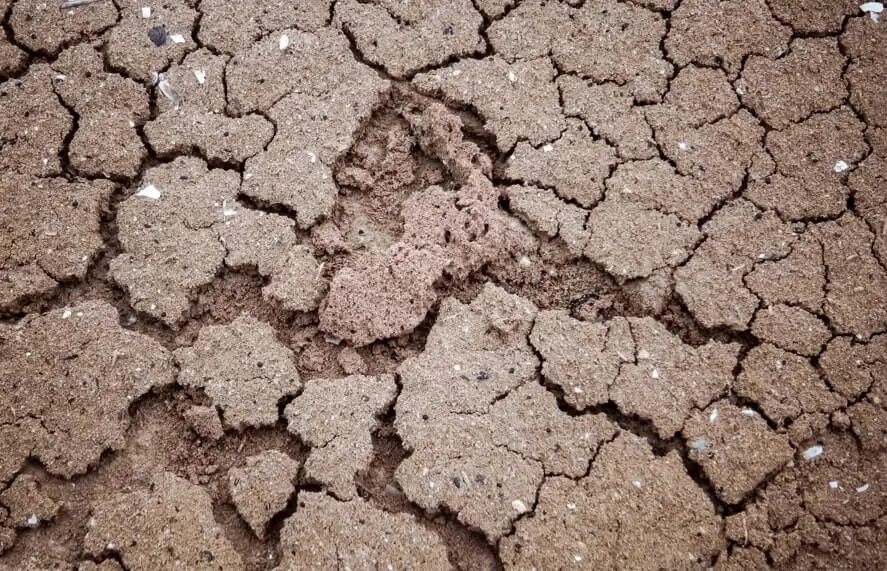
Crusting soil surface problems can seriously impact the health of your container fruit plants by blocking water absorption, limiting airflow, and restricting root development. When the top layer of soil hardens into a dense crust, it becomes difficult for moisture and nutrients to penetrate, leaving your plants stressed and undernourished. Understanding what causes soil crusting—and how to fix and prevent it—is essential for maintaining loose, fertile soil that supports strong growth and abundant fruit production.
Why Crusting Soil Surface Problems Matter in Container Fruit Gardening
In garden beds, soil has a natural ability to recover thanks to worms, microbes, and deep root systems. Containers, however, are a closed environment—and that makes crusting soil surface problems far more damaging for fruit plants grown in pots.
How soil crusting affects container fruit plants
When the soil surface hardens:
- Water runoff increases instead of soaking into the root zone
- Oxygen exchange is reduced, suffocating fine feeder roots
- Root growth becomes shallow, weakening the plant’s stability
- Nutrient uptake declines, even if fertilizer is present
For fruit trees and fruiting plants, this leads to:
- Slow or uneven growth
- Flower drop and reduced fruit set
- Increased sensitivity to heat stress
- Higher risk of salt buildup and root damage
If you’ve already noticed weak root systems, this issue often overlaps with poor root development in potted fruit trees, where compacted soil prevents roots from expanding properly.
Why containers are especially vulnerable
Container soil crusts faster because:
- Frequent watering breaks down soil aggregates
- Fine potting mixes settle and compact over time
- Organic matter decomposes without replacement
- Sun exposure bakes the soil surface
Unlike open ground, containers don’t self-correct. Once crusting begins, it usually gets worse unless you intervene.
What Causes Crusting Soil Surface Problems in Pots?
Understanding the root cause is essential before applying solutions. In most cases, crusting comes from a combination of factors rather than a single mistake.
1. Overwatering with poor drainage
Repeated surface watering causes fine soil particles to float upward. When the water evaporates, these particles bind together into a hard crust.
This issue often appears alongside excessive salt accumulation in container soil, where evaporation leaves minerals concentrated at the surface.
2. Low organic matter content
Soils lacking compost or organic fibers lose structure quickly. Without organic matter to bind particles loosely together, the surface seals over after watering.
If your potting mix looks lifeless or dusty, it may also suffer from a lack of beneficial microorganisms in potting soil, which normally help maintain soil structure.
3. Using garden soil instead of potting mix
Garden soil is too dense for containers. When used in pots, it compacts rapidly and forms an impenetrable surface layer.
4. Repeated top watering without soil disturbance
Watering in the same spot every day compresses the soil surface, especially when using narrow-spout watering cans or drip emitters placed too close to the soil.
5. Heat and sun exposure
High temperatures bake the soil surface, especially in dark-colored pots. This is commonly linked with soil temperature stress on container roots, which further worsens root health.
Step-by-Step Solutions to Fix Crusting Soil Surface Problems
If your containers already have crusted soil, don’t worry. These practical steps can restore soil health without harming your fruit plants.
Step 1: Gently break the crust (without damaging roots)
Use a hand fork, chopstick, or your fingers to loosen the top 1–2 cm (½–¾ inch) of soil.
Do this carefully:
- Avoid deep digging near the trunk
- Focus on the outer root zone
- Work when soil is slightly moist, not dry or muddy
This immediately improves water infiltration and oxygen exchange.
Step 2: Apply a protective mulch layer
Mulch is one of the most effective long-term fixes for crusting soil surface problems.
Best mulches for container fruit plants:
- Coconut coir
- Pine bark fines
- Straw (chopped)
- Compost (light layer only)
Apply a 2–4 cm (1–1½ inch) layer, keeping it slightly away from the trunk.
Benefits include:
- Reduced evaporation
- Prevention of surface sealing
- Improved microbial activity
Step 3: Improve your watering technique
Instead of fast, heavy watering:
- Water slowly to allow absorption
- Use a rose-style watering can or gentle hose spray
- Water in two passes (wait 2–3 minutes between)
This prevents soil particles from splashing and sealing the surface again.
Step 4: Top-dress with compost or worm castings
Every 4–6 weeks, add a thin layer of:
- Mature compost
- Worm castings
This feeds soil life and rebuilds crumb structure naturally. It’s also a safe way to correct mild nutrient issues without risking fertilizer burn.
Step 5: Flush the soil occasionally
If you see white residue or hard layers forming repeatedly, flush the container with clean water until it drains freely. This helps prevent surface crusting caused by mineral buildup, especially in dry climates.
Preventing Crusting Soil Surface Problems Long Term
Fixing crusting is good—but preventing it saves time and protects plant health.
Choose the right potting mix from the start
A quality container mix should:
- Drain well
- Contain organic matter
- Stay slightly springy when squeezed
Avoid mixes that turn dusty when dry or muddy when wet. If needed, amend with compost or coco coir.
Refresh container soil annually
Fruit plants grown long-term in pots need soil renewal. Each year:
- Remove the top 5–8 cm (2–3 inches) of old soil
- Replace with fresh potting mix and compost
This simple habit prevents compaction and nutrient imbalance.
Match pot size to plant size
Undersized containers dry out quickly and crust faster. Proper sizing reduces stress and improves root distribution.
Protect soil from extreme heat
Use:
- Light-colored pots
- Shade during peak heat
- Pot feet to improve airflow
This reduces surface baking and moisture loss.
Common Mistakes Beginners Make
Even well-meaning gardeners often worsen crusting without realizing it.
Mistake 1: Pressing soil down firmly after watering
This compresses particles and accelerates crust formation.
Mistake 2: Leaving soil bare
Bare soil is exposed to sun, wind, and evaporation—perfect conditions for crusting.
Mistake 3: Overusing liquid fertilizers
Frequent liquid feeding can contribute to salt accumulation, which hardens the soil surface over time.
Mistake 4: Ignoring early signs
If water starts pooling or running off the surface, crusting has already begun. Early action prevents deeper problems.
Tools, Soil, and Care Tips That Help
You don’t need expensive equipment—just smart choices.
Helpful tools
- Hand fork or soil aerator
- Watering can with rose head
- Moisture meter (optional)
Soil amendments to keep on hand
- Compost
- Worm castings
- Coconut coir
Simple care habits
- Rotate watering spots
- Mulch consistently
- Observe water absorption after each watering
These small adjustments make a big difference over time.
FAQ: Crusting Soil Surface Problems
Why does water run off instead of soaking into my pot?
This happens when a hardened soil crust blocks infiltration. Loosening the surface and adding mulch usually solves the issue quickly.
Is crusted soil bad for fruit trees in pots?
Yes. It restricts oxygen and water movement, leading to weak roots and poor fruit production.
Can I just replace the soil entirely?
For severe cases, yes. But most crusting problems can be fixed with surface treatment and better care practices.
How often should I loosen the soil surface?
Light loosening every 2–4 weeks is enough, especially if you mulch afterward.
Does compost alone prevent soil crusting?
Compost helps, but combining it with mulch and proper watering gives the best results.
Conclusion: Healthier Soil Starts at the Surface
Crusting soil surface problems may seem minor, but they have a major impact on container fruit plants. By improving water infiltration, protecting the soil surface, and rebuilding organic structure, you create an environment where roots can breathe, nutrients stay available, and fruit plants grow with confidence.
Start today by gently loosening the soil, adding mulch, and adjusting how you water. Over time, these simple steps will transform hard, lifeless surfaces into healthy, living soil—giving your container fruit plants the foundation they need to thrive.
Your plants will show the difference long before harvest time.